Technical Information & Fitting
Each BCC Performance Brake caliper has been designed as a 'direct fit'. This means that our calipers bolt in exactly the same holes as the original equipment.
Fitting our kits is something that an owner with mechanical experience can do at home. However, with the passing of years, there may have been some wear or modification to your particular vehicle.
If you are concerned, then please get in touch or have a qualified mechanic fit and test the kit.
Content of our performance braking kits
Each BCC Performance Braking caliper kit includes the following to allow for a 'direct fit' to your classic car. Each kit is a simple bolt-on installation requiring no permanent modification to the vehicle and is completely reversible. Vented kits for cars equipped with solid brake discs as standard, and drum to disc conversions will include brake discs and caliper mounting plates where applicable
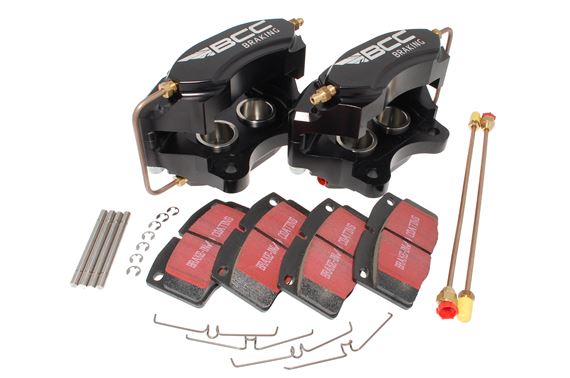
Calipers
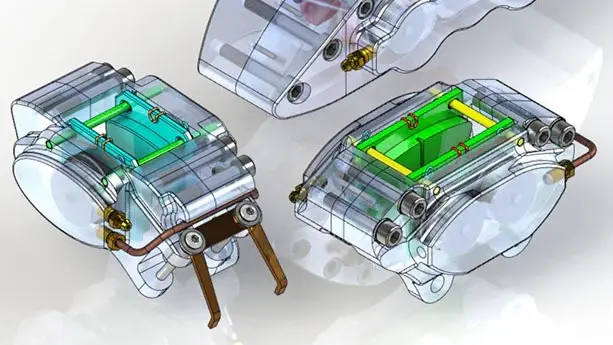
Two fully built 4-piston calipers are provided in every kit. The pistons and seals are pre fitted and they have been pressure tested. All our aluminium calipers are anodised.
Brake Pads
We supply a new set of brake pads to be fitted to the calipers (including pins, clips and springs) Our all pads are made by EBC.
Pipes & Bleed Nipples
Each caliper has a set of bridge and feed pipe extensions (in most cases not required) as well as new bleed nipples.
Additional items
- Some caliper sets require the use of top-hat bushes for the fixing bolt appatures. Where required they will be supplied
- Shims: It is sometimes necessary to centre the caliper on the disc. There are a set of shims supplied in every kit to do this.
Fitting a BCC Performance Braking Caliper Kit
Our calipers are designed to be a straight bolt-on replacement for your existing brakes with no modification to your vehicle. However please bear in mind that car production decades ago was far less consistent than today’s standards and minor differences are often found in classic vehicles. Therefore it might be necessary to space the calipers with the shims provided.
We have been switching from e-clips to R-clips on our brake pad retaining pins to make assembly and changing pads easier (customer feedback told us e-clips tend to ping across the garage when fitting!). Some of our pins still use e-clips in which case we recommend using a small flat head screwdriver to push them into place.
Remember that we have a network of approved fitting centres and our distributor Classic Collective can fit a set of our brakes to your vehicle in just 2 working days at their workshop in Bicester.
Step-by-step guide to fitting our performance calipers
Safety
Brakes are a safety critical component of your car, only carry out a DIY fitment if you have the relevant experience and are 100% confident in your ability
- Make sure you have all the tools and fluids you need to complete the job
- Make sure you have read and understood the FAQ's before you start
- Only use quality jacks and axle stands when removing the wheels & tyres.
- Always chock the car before jacking it up
- If in doubt, check with a professional classic car mechanic
- We recommend using gloves and a particle mask whilst you work on brake components
Tools required
- Vehicle jack and axle stands
- Wheel 'chock'
- Socket set (metric or imperial depending on vehicle)
- Spanner set (metric or impreial depending on vehicle)
- Torque wrench
- Brake bleeding kit
- Gloves and mask
Consumables required
- DOT 4 Brake fluid
- Silicon brake grease or red rubber grease
- Brake cleaner
- Emery cloth
Preperation
- Always wear gloves and a mask when undertaking brake work
- Jack your vehicle up on a flat, hard floor
- Place axle stands under the vehicle to support its weight fully
- Place a chock behind the rear wheels to make sure it does not fall off the stands
- Remove the front wheels
- Clean the brakes down with brake cleaner and a cloth to minimise the amount of brake dust in the immediate atomsphere.
- If you are not replacing the discs, make sure they are clean and free from corrosion by rubbing them down with emery cloth.
- Inspect the condition of the brake hoses, if in doubt, replace them
Removing your old calipers
- The caliper is typically secured with two bolts. These are often locked with a folded locking tab, which must be flattened before the bolts can be undone. While reusing tabs is possible, fitting new locking tabs on refit is strongly recommended.
- Other retention methods may include thread-locking compound (equivalent to Loctite 243) or spring washers.
- Expect these bolts to be tight. They are designed that way, so removal may take time and effort.
- Next, carefully disconnect the brake line from the caliper. Have a suitable container ready to catch any brake fluid and avoid contact with paintwork.
- Although newer flexible brake hoses can sometimes be clamped, we do not recommend clamping older hoses, as they can split. Braided hoses must not be clamped, as this can damage or deform them. If there is any doubt, replace the flexible hoses at the same time.
- It is often easier to disconnect the flexible brake hose from the hard line fitting, allowing the hose to settle into a natural, unstressed position when fitting the new caliper.
- This is not always straightforward. Fittings can seize and hard lines may be degraded. If their condition is uncertain, apply a generous soak of penetrating oil before attempting removal.
Fitting your new calipers
- Calipers are handed, so ensure the bleed nipple is positioned at the top.
- Check that the bleed nipple is closed. Finger tight is sufficient and helps prevent unexpected leaks.
- If a back plate is fitted, it may need to be removed or modified if the new caliper is larger than the original.
- Offer the caliper up to the mounting holes and check alignment. The caliper must sit centrally over the disc.
- If it does not, shim the caliper using the washers supplied. These fit between the mounting face and the caliper lug, positioned on the mounting bolt shank.
- Once alignment is correct, fully install the mounting bolts using Loctite 243 or equivalent, new locking tabs, or new heavy-duty spring washers as appropriate. Apply the correct torque for the caliper and mounting material.
- Ensure the pistons are fully retracted using a piston spreading tool or, if necessary, a small pry bar used carefully.
- Insert the brake pads. They should slide in freely without resistance.
- Fit the anti-rattle shims, then install the retaining and location pins.
- Finally, spin the disc. A slight amount of contact is acceptable, but there should be no binding.
Final checks
- Carry out final checks to ensure that all bolts and brake pipe unions are fully connected and correctly tightened. Once confirmed, bleeding the brake calipers can be carried out.
- Follow the standard brake bleeding procedure, either using a one-person bleeding kit or with the assistance of a second person. Ensure the brake fluid reservoir is kept topped up to the correct level throughout the process.
- Once a firm and consistent brake pedal feel has been achieved, refit the wheels and torque the wheel bolts or nuts to the manufacturer’s specified setting.
Running in & Care
- Brake pads are supplied with a running-in coating which is removed through normal driving and brake use. A difference in brake pedal feel should be expected for the first 20 miles or so, until the pads reach their optimum performance level.
- Alternative pad compounds are available, offering different characteristics and applications. The pads supplied with the calipers are a spirited road compound, suitable for most classic car driving.
- The calipers are manufactured from coated aluminium. Regularly removing brake dust and washing the wheels, particularly after driving on salted roads, will help to preserve the caliper finish and prolong service life.

To install this Web App in your iPhone/iPad press
![]() and then Add to Home Screen.
and then Add to Home Screen.
